My life has evolved the last decade with home ownership and land ownership. And in the last year, I now have my first construction project coming online. I am looking to build my workshop and first permanent building on my land.
To start the project, my partner and I have cleared a quarter acre of timber to reuse in the project. We now have a lovely stack of 50 logs and have sold quite a firewood quantity. This left us with a site with about 100 stumps sticking out of the ground on a site “reasonably” flat for the land. The stumps were dug out with our backhoe and will be reused, hopefully to nourish one of our fields.
Now we have a site with little vegetation above or in the ground; we have about one to two feet broken sandstone and then bedrock. Only problem is that it is “reasonably” — or more specifically not at all — level.
One issue at this stage of construction is to make sure the view and the drainage of our site is correct. To achieve that I am building the site up rather than digging effectively a hole to level the site. However, a key question for us and our 13 yard dump truck is, how much material will bring us to level and at what height?
For that, I have determined it is time to measure! And from those measurements, we can create a topographic map to send to a geotechnical engineer and ask the computer to tell us how much fill material we need. A builder’s level, matplotlib and numpy to the rescue!
Builder’s Level
For those of you who are unfamiliar with a builder’s level it is a precision distance and height measuring instrument which uses the fact that light travels in straight lines. One levels a builders level on a tripod with a bubble level and then sights on a grade rod. A grade rod is a flat bar with demarcations; in my case the rod has a mark every tenth of an inch and can extend up to 20′ tall. One also uses a bubble level when holding the grade rod to ensure the grade stick is perfectly level. Using these three devices, one can measure the height of the ground quite precisely and the distance from the builder’s level very well as well. A nice example of the usage can be seen demonstrated by fellow Coloradoan Jim Anderson on Fine Homebuilding.
My partner and I spent an afternoon one day and came up with a list of measurements surveying four lines of the site. This resulted in a file of x, y coordinates and height at the view of the builder’s level. These 42 measurements give us a reasonable idea but I wish I had more.
To read in the data we recorded, I chose to make a dictionary with its keys being the x-axes values; the x-axis being our North to South line of measurement. Each dictionary value was then a dictionary with its keys being the y-axis (East-West) distance from the level determined via the builder’s level’s stadia lines (lines above and below the measurement line); and the values are the depth (how much fill is needed at that point to level) to the eye-level height at our datum. This was all read in via CSV file:
# read in data
heights = defaultdict(dict)
with open("Workshop/Grading/from_datum") as f:
    h = csv.DictReader(f, fieldnames=["x", "y", "z"])
    for l in h:
        heights[int(l['x'])].update({int(l['y']):float(l['z'])})
Still how now to visualize the points?
Verify the Data
First things first, is to verify our measurement data. This was at first simply looking how to do a crude three-dimensional scatter plot to ensure that I did not put down bad data in my notes. I looked to use Python and the matplotlib library for this. One thing I did not anticipate was the variety of data-layouts that matplotlib might use!
Scatter and Polygon Plots
One way to create a three-dimensional scatter plot in matplotlib is to layout your data in three arrays. All arrays are indexed the same for each data point; one array for the x-dimension, one for the y-dimension and one for the z-dimension. This is a quite easy and straightforward!
# create data arrays
x_array = list()
y_array = list()
z_array = list()
x_keys = list(heights.keys())
x_keys.sort()
for (x, d) in ((x, heights[x]) for x in x_keys):
for (y, z) in d.items():
x_array.append(x)
y_array.append(y)
z_array.append(z)
# build a scatter plot of observations
fig = plt.figure()
ax = fig.gca(projection='3d')
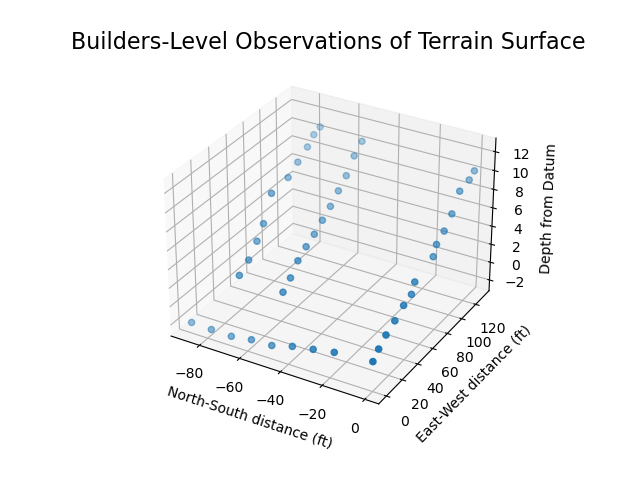
ax.set_title("Builders-Level Observations of "
"Terrain Surface", fontsize=16)
ax.set_xlabel('North-South distance (ft)')
ax.set_ylabel('East-West distance (ft)')
ax.set_zlabel('Depth from Datum')
ax.scatter([-1*v for v in x_array], y_array, z_array)
fig.show()Next comes a three-dimensional polygon plot to show the profile of our data. This allows me to see if the data represents the curves, divots and bumps in the land as I know it. However, opposed to the scatter plot, here we need a two-dimensional vertex array. This was a bit confusing how to layout the data from the add_collection3d API docs.
In the end, the vertices are specified as an array of (in my case) y-dimension and z-dimension tuples. From there one then provides an array of x-dimensions along which those vertices are rendered. An fiddly addition needed as well is a termination point for the polygon so one doesn’t have a funky slope from the first to last point which would draw the eye away from the important data of what we recorded; similarly, since we have no other points to visualize the singular y-axis recordings with we have to skip all of those.
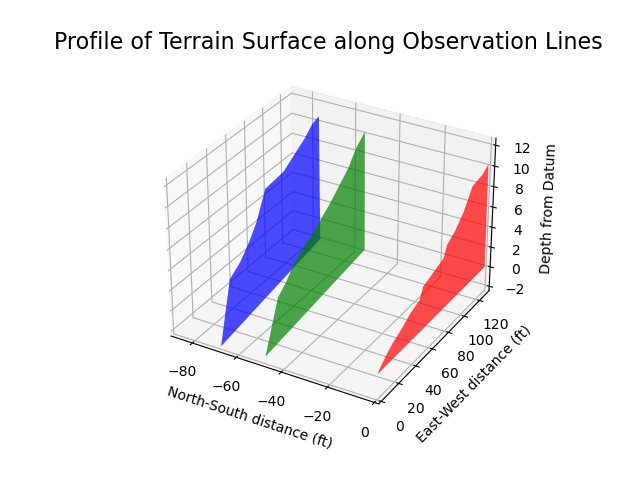
Note, this code only shows how the x-axis polygons were created, the full code download shows the process for creating the polygon which goes down y=0 as well.
# polygon vertices used for filled plot graph
verts=[]
x_keys = list(heights.keys())
x_keys.sort()
for (x, d) in ((x, heights[x]) for x in x_keys):
  line = []

  for (y, z) in d.items():
    # need y, z lines
    line.append((y,z))

  # only plot filled lines if we have
  # two or more observations
  if len(line) > 1:
    # set the last value of every filled plot line to 0
    line.append((y+1,0))
    verts.append(line)

colors = [mcolors.to_rgba('r', alpha=0.6),
          mcolors.to_rgba('g', alpha=0.6),
          mcolors.to_rgba('b', alpha=0.6)]

# only plot x-lines which have more than one observation
# so north is "farther away" than south flip the x-values
zs = [-1*a for a in x_keys if len(heights[a])>1]
fig = plt.figure()
ax = fig.gca(projection='3d')
ax.set_title("Profile of Terrain Surface along"
             "Observation Lines", fontsize=16)
ax.set_xlabel('North-South distance (ft)')
ax.set_ylabel('East-West distance (ft)')
ax.set_zlabel('Depth from Datum')
poly = PolyCollection(verts, facecolors=colors)
ax.add_collection3d(poly, zs=zs, zdir='x')
# so north is "farther away" than south flip the x-values
ax.set_xlim3d(-1*max(x_keys),min(x_keys))
ax.set_ylim3d(min(y_array), max(y_array))
ax.set_zlim3d(min(z_array), max(z_array))
fig.show()
Putting the Verification Together
Now to see the graphs combined tells us the surface “shape” and allows us to see each observation made. We can leverage matplotlib’s ability to plot multiple plots on the same graph to achieve our final verification output:
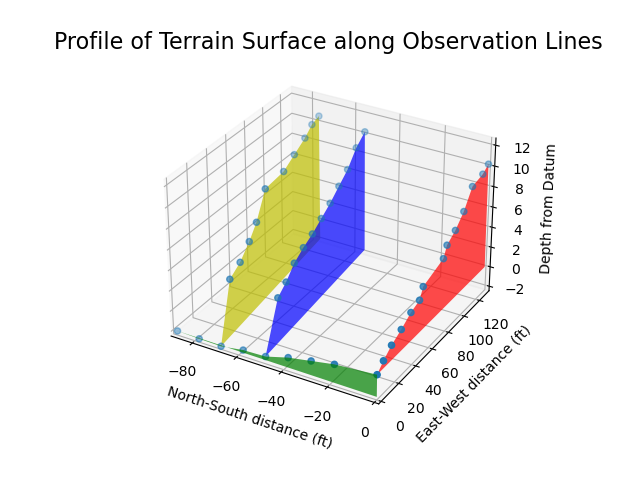
Thanks to the matplotlib polygon demo code for helping me figure this graph type out.
Generating a Topographic Map
Now to convey the total surface to a geotechnical engineer I wanted to provide a topographic map. As while the points are useful and one can figure out how much total fill is needed, there are surface irregularities which are not readily apparent hiding among the data.
Drawing Smooth Curves
One challenge in generating a topographic map is that one needs isopleths which are continuous lines and not simply discrete points. Here we can leverage interpolation to connect our discrete points generating smooth curves. I used an interpolation function from matplotlib’s triangular grid module and picked an interpolation class which visually fit my understanding of our lightly sampled land. I would have fallen back onto various spline drawing techniques myself, if I had to implement such an interpolation method and am not sure of the internals of matplotlib’s. More can be found in their documentation on the CubicTriInterpolator class.
The challenge for using the interpolation class was we again needed a different layout of our observed data. This time we needed a regular grid on which to lay our data. This was quite easy to generate and I picked a grid from my min to max observation along each axis with a spacing of one unit (equal to one foot) on each grid. This was achieve via the numpy methods:
x_grid = np.arange(0, max(x_array), 1)
y_grid = np.arange(0, max(y_array), 1)
I could again provide the x, y and z arrays to the interpolation functions at least and this provided me back a large numpy array with a 2-dimensional matrix of lines along the x-axis for each y-value on my grid.
# interpolate the data between our observation lines
triang = tri.Triangulation(x_array, y_array)
# Cubic looks more like the understood lay of the land
# interpolator = tri.LinearTriInterpolator(triang, z_array)
interpolator = tri.CubicTriInterpolator(triang, z_array,
                                        kind='min_E',
                                        trifinder=None,
                                        dz=None)
Xi, Yi = np.meshgrid(x_grid, y_grid)
zi = interpolator(Xi, Yi)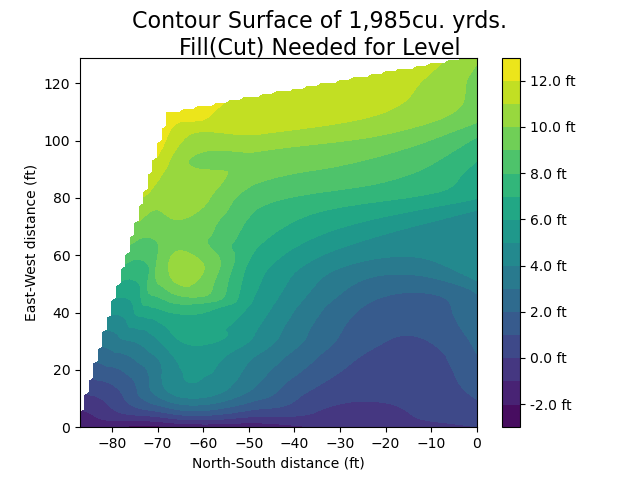
# plot contour surface
fig = plt.figure()
fig.suptitle(f"Contour Surface of {cu_yrds_fmt_interp}cu. yrds.\nFill(Cut) Needed for Level", fontsize=16)
plt.xlabel('North-South distance (ft)')
plt.ylabel('East-West distance (ft)')
levels = 15
cs = plt.contourf(-1*x_grid, y_grid, zi, levels)
cbar = fig.colorbar(cs, format='%1.1f ft')
plt.show()
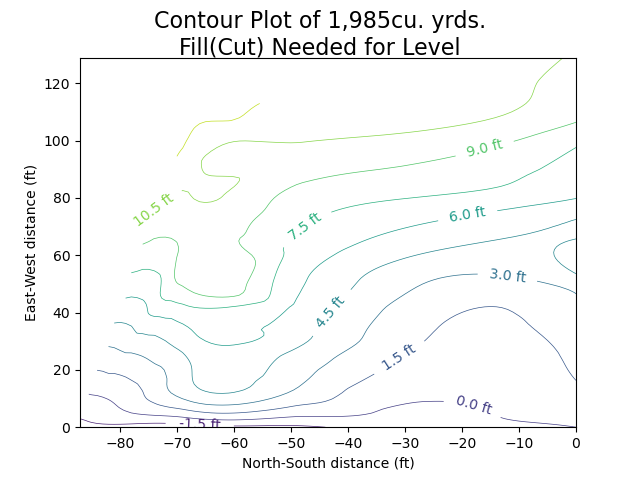
# plot contour plot (2D topomap)
fig = plt.figure()
fig.suptitle(f"Contour Plot of {cu_yrds_fmt_interp}cu. yrds.\nFill(Cut) Needed for Level", fontsize=16)
levels = 10
cs = plt.contour(-1*x_grid, y_grid, zi, levels, linewidths=0.5)
plt.xlabel('North-South distance (ft)')
plt.ylabel('East-West distance (ft)')
plt.clabel(cs, cs.levels[:levels], fmt='%1.1f ft', inline=True, fontsize=10)
plt.show()
Of Numerical Integration and Estimating Fill Quantity
One key result I hoped to arrive at was the expected quantity of fill I would need to bring my building pad to level. To do this one can use a technique called numerical integration. A trivial technique is the trapezoidal rule which numpy thankfully implements. Here, we take the value for each line along the x-axis to determine how much area there is under that curve in two-dimensions and multiply it by how much distance there is to the next line of observations to get a three-dimensional value — how many cubic yards of fill I need acquire.
# use the observed values making each slice as thick
# as the space to the next observation slice
# hold tuple of (x_val, integral)
x_integrals=[]
for k in x_keys:
  y_keys = list(heights[k].keys())
  y_keys.sort
  # zero measures that are cut slopes (negative fills)
  non_neg_values = [max(heights[k][v],0) for v in y_keys]
  one_d_integration = np.trapz(y_keys, non_neg_values)
  # only record integrations and x values that are non-zero
  if one_d_integration > 0:
      x_integrals.append((k, one_d_integration))

# find distance between x-rows
x_rows = [x_val for (x_val,integral) in x_integrals]
row_spaces = list(np.diff(x_rows))
# get distance to last observation row
row_widths.append(max(x_keys) - max(x_rows))

# number of cubic yards of fill needed
cubic_yards = sum(np.array(row_widths) * [integral for (x_val,integral) in x_integrals])/27
# with commas
cu_yrds_fmt = "{:,}".format(int(cubic_yards.round()))
A very neat thing is that we can also use a similar process to integrate over our interpolated data which is more smooth than our few points of observation. Here the difference is about two of my tandem-axle dump trucks full out of at least 152 loads.
If you would like to see the whole file and all the data and code necessary to make this example, feel free to take a look at the repository of code and data here. It can be run with a Python 3, matplotlib 3.1.1 and any modern numpy.